Introduction
The path to becoming a skilled archer is fraught with challenges, but the payoff is worth the effort. The following 11 Steps to Archery Success can help you become a better archer, whether you’re just starting and want to learn the basics or you’re an expert who wants to keep improving. These measures cover all you need to know to become a skilled archer, including gear, technique, safety, and mental fortitude. If you follow these instructions carefully, you’ll be well on your way to becoming the best archer you can be.
Select the Right Equipment:
Purchase a set of bows and arrows well suited to your height, weight, and preferred shooting method. The bow, arrows, and other equipment like sights and stabilizers are all part of this.
Learn Safety First:
Put safety first by learning and obeying all applicable archery safety rules. Always fire into a safe backstop, use safety equipment, and don’t aim your bow at anything you don’t want to hit.
Proper Stance and Posture:
It would help if you straightened out your posture. Aim with a straight back, a relaxed chest, and feet spaced shoulder-width apart.
Grip and Hand Placement:
Keep your hand steady and loose on the bow so as not to twist it. Keep your bow hand steady and your gaze fixed in one place.
Nocking and Drawing:
Consistently nocking your arrow and drawing the string should be a priority during practice. Avoid jerky motions in favor of ones that are smooth and controlled.
Aiming and Sighting:
Learn how your sights work and get some target practice in. Keep your sight pins in line with the target and your aim steady.
Release Technique:
Master a release technique that is both easy and reliable. Focus on a smooth, non-jerky release using your fingers or a mechanical release assist.
Follow Through:
Keep your form and sight on the target even after letting go of the arrow. The results are more reliable and precise as a result.
Consistent Practice:
Dedicate regular time to practice, but focus on quality over quantity. Consistency is vital, so establish a training routine that works for you.
Record and Analyze:
Record and assess your shooting form using video or coach comments. The key to development is error detection and correction.
Mental Toughness and Visualization:
Strengthen your mind by training your ability to focus, visualize, and relax. Visualize yourself making the shot successfully.

Check also Trendy Costco Columbia Pullover.
What are the 11 steps to archery success?
NASP 11 Steps to Archery Success
Choosing the proper gear is the first step to becoming a proficient archer. It would help if you matched your physical characteristics, shooting style, and ability level to your bow and arrows. A more in-depth explanation of the 11 steps to archery success NASP is as follows:
Step 1
Choosing Your Bow:
The recurve bow’s ease of use and adaptability make it perfect for novice archers. Depending on your draw length, select the appropriate size.
The mechanical advantages of a compound bow make it a versatile weapon, useful for hunting and target practice. Choose a compound bow whose draw length and weight you may alter to suit your stature.
For those interested in archery’s heritage, though, nothing beats the feeling of using a longbow or recurve. Pick a bow that complements your playing style and skill level.
Picking an Arrow:
By gauging your draw length, find the spot between being too short and too lengthy.
Your bow’s draw weight and how you fire (traditional or compound) will determine the spine (stiffness) of the arrows you should use.
Consider wood, aluminum, or carbon for your arrows, depending on your taste and budget.
Additional Equipment:
Those who shoot compound bows should spend money on high-quality add-ons such as sights, stabilizers, arrow rests, and release aids.
Ensure the bow accessories you buy work with your bow, making shooting easier.
Seek Expert Opinion
If you want expert advice on what gear is best for you, visit an archery pro shop or talk to a coach specializing in the sport.
It’s a good idea to experiment with various bows and arrows to find the one that best suits your shooting style and needs.
By beginning your archery career with tools ideally suited to your body and shooting style, you can set yourself up for success.
Step 2
In archery, safety comes first, so it’s essential to learn and follow all applicable rules and regulations. To protect the security of your archery sessions, below is a more in-depth explanation of safety measures:
Educate Yourself:
First, study the regulations and standards for safe archery practice carefully. Target shooting and hunting are two distinct types of archery, and both may have different rules.
Choose Safe Locations:
Only fire an arrow if you’re in a safe, designated archery range. Make sure there are sufficient targets and backstops at the range.
Use Appropriate Targets:
Use protective foam or bales of straw as targets to prevent injury. Avoid shooting at flat or hard objects since arrows may rebound off them.
Follow Range Rules:
It would help if you obeyed all range rules and regulations and the directions of any range officers or supervisors while using an archery range.
Wear Safety Gear:
Protect your arm and forearm from string slaps, fingers from unintentional string contact, and eyes from debris and unintended contact with the bowstring using the necessary safety equipment.
Keep Bows Pointed Downrange:
Always keep your bow pointing down when you’re on the firing line. Never point your bow at anything you don’t intend to shoot, whether a person, animal, or thing.
Never Dry Fire:
Never shoot a bow without an arrow nocked (a.k.a. “dry firing”). This is dangerous and can cause harm to your bubble.
Maintain Safe Distances:
When it’s not your turn to shoot, keep your distance from other archers and wait in line.
Know Your Surroundings:
Look for obstacles like trees, rocks, or sloping ground that could ruin your aim.
Maintain Control: Always keep your bow and arrow under close control, even when unused. Never let anyone loose with a loaded bow.
Do not discharge arrows into the sky, as they may hit unsuspecting people, animals, or property at a great distance.
You may keep yourself and those around you safe from harm by strictly adhering to archery safety procedures. A commitment to safety is the bedrock of a fulfilling and successful archery experience.
Step 3
The key to success at archery is maintaining a steady stance and posture. Accuracy and Consistency in your shots depend heavily on your body’s alignment and balance. Here’s a more in-depth look at the ideal stance and posture for shooting an arrow:
Stand Perpendicular to the Target:
Keep your body perpendicular to the intended objective. This position has your side facing the target and your feet perpendicular to the aim line.
Shoulder-Width Apart:
Maintain a steady stance with your feet at about shoulder-width apart. Be sure to put equal pressure on both feet.
Weight Distribution:
Avoid putting too much pressure on your toes or heels by distributing your weight evenly between your feet. A well-balanced body allows for steady aiming and shooting.
Straight Back:
Keep your head and spine in a neutral position. Don’t slump over or lean to one side.
Relaxed Chest and Shoulders:
Don’t tense up your chest or shoulders. It’ll show in your form and aim if you’re tense there.
Square Hips and Shoulders:
Maintain a straight line from your hips and shoulders to the goal. Because of this, less body twisting occurs during the draw and release.
Head Position:
Maintain an upright, non-slumping posture with your chin parallel to the floor. Don’t squint or raise your chin because it could throw off your aim.
Elbow Position:
Shooting with your bow arm stretched straight toward the target is essential. Your bow arm’s elbow should be neutral, neither bent nor hyperextended.
Bow-Hand Grip:
Keep your hold on the bow light and loose, letting it rest comfortably in your hand. Try not to tense up your bow hand too much.
Proper Alignment with the Target: Focus your body’s alignment on the objective. Position your non-dominant eye so it is over the arrow and facing the target.
Consistency:
Always use the same stance and posture when shooting. The key to better precision is maintaining Consistency.
Remember that your archery technique relies heavily on your stance and posture. You can perform shots with more precision and control if your body is steady and in the correct position. Maintaining these aspects via consistent practice is crucial to your success as an archer.
Step 4
A consistent and precise archer’s shots depend on their grip and hand placement on the bow. Learn the correct grip and hand positioning with this comprehensive guide:
Bow Hand:
When you draw a bow, you use the hand holding the riser (handle).
Use a loose, open grip on the bow’s handle. It would help if you held the handle in a relaxed, cradling grip.
Make contact with the bow’s grip using your thumb and palm rather than your fingers.
Maintain a firm, perpendicular bow hand as you shoot. Keep the bow level, and do not lean to the left or right.
Keep your wrist from bending, as this can affect your shot consistency.
Bow Arm:
You use your bow arm to draw and shoot.
Keep your elbow slightly bent and your arm fully extended toward the target. Don’t hold tension by locking your elbow.
Keep your shoulder down and relax on your bow arm.
Gaze and Focus:
Concentrate your eyes on a single part of the objective. This helps you stay focused on your ultimate goal.
Keep your head up and your non-dominant eye level with the arrow. This guarantees straight shooting.
Maintain Consistency:
Maintain a steady grip and hand position while shooting a bow. With practice, muscle memory forms, and one’s aim improves.
Avoid Torque:
Pay attention to how much torque (twisting) you apply to the bow. The arrows won’t fly straight if you twist the bubble too much.
Keep your grip loose, and don’t swerve the bow to the left or right when you draw or let go to avoid torque.
Bow Sling or Wrist Strap:
Some archers employ a sling or wrist strap to keep the bow from slipping out of their hand. This can help you keep your grip loose and steady after firing the bow.
Consistent and precise shooting requires a good grip and hand placement. Maintaining a calm bow hand and a steady stare on the target will improve your archery accuracy and reduce shot variation. Success at archery will significantly benefit from your consistent practice of these fundamentals.
Step 5
Now we come to the fifth step of our topic, 11 Steps to Archery Success. The accuracy and consistency of an archer depend on their ability to consistently and quickly accomplish the two most essential parts in the process: nocking the arrow and drawing the bowstring. Learn the ins and outs of archery’s nock and draw with this comprehensive tutorial.
Nocking the Arrow:
Check that the slot at the end of your arrow (the nock) is intact and securely fastened to your bowstring.
After ensuring the nock is in line with the bowstring, rest the arrow’s shaft on the arrow rest.
Secure the nock onto the bowstring by pressing it firmly and evenly with your fingers or a nocking tip.
Make sure the arrow is nocked tightly and won’t fall out.
Drawing the String:
Maintain the correct stance and posture for an archer.
Relax and hold the bowstring loosely in your drawing hand. If you’re shooting a compound bow, your index and middle fingers should rest above the nock, while your ring and pinky should rest below it. The standard draw length for recurve and conventional bows is three fingers.
Extend your sketching arm and begin drawing the thread steadily and smoothly.
Don’t let your drawing elbow drift laterally; keep it high and aligned with the arrow.
Keep your draw length constant; your shots will always land at the same anchor point.
If your bow has a peep sight, line up the dot with the pupil of your dominant eye.
Keep your draw smooth and controlled; any jerky motions will throw off your aim and cause you to miss more often.
Anchor Point:
Find a comfortable resting place for your drawing hand, such as against your face, and stick with it. You’ll find this under your chin or at the side of your mouth.
The anchor point is a valuable tool for maintaining accuracy in both shooting and aiming.
Back Tension:
Maintain a steady draw by using your back tension. This involves utilizing your back muscles instead of your arms to pull the bowstring.
Try practicing with some stress in your back to improve the smoothness and control of your drawing motion.
Release Smoothly:
Don’t make any jarring motions or movements as you prepare to release the arrow. Keep sight of your end goal as you go.
Building muscle memory and shooting accurately in archery requires regular practice of the nocking and drawing motions. You can improve your accuracy and consistency as an archer by training often and focusing on using fluid, controlled actions.
Step 6
The precision and success of an archer depend heavily on their ability to aim and sight. Follow these steps to learn suitable sighting methods and sharpen your aim:
Understand Your Sights:
Learn how to use the bow’s sight system. Multiple pins or an adjustable pin are standard on most modern bows and even more so on compound bows.
Master the art of adjusting your sight pins for different ranges. Check that the distance between your nails and the target matches your expectations.
Consistent Anchor Point:
Keep your drawing hand anchored to your face or other fixed place. This will help you keep your eye level with the sight and on target.
Using the area beneath the jaw, the corner of the mouth, or the cheekbone as an anchor is familiar.
Sight Alignment:
Get your sight pins lined up with the target. Don’t let the pins wander off the goal.
If you’re using a peep sight, set it up to face your dominant eye. Tweak it to fit your needs.
Steady Aim:
Keep your sights fixed on your goal. Keep your movements to a minimum, and don’t hesitate to take a picture.
Holding the bow at full draw with your back muscles helps limit vibrations.
Breath Control:
Focus on the air you’re taking in and out. Before you shoot, please take a deep breath, slowly release it, and hold it as you aim.
Improving your ability to regulate your breathing will help you hit your target more consistently.
Visualize the Shot:
Think about where the arrow will hit and how it will get there. If you’re having trouble concentrating, try doing some visualizing.
Practice and Experiment:
Shoot from a variety of distances and work on your aim consistently. Find your optimal shooting method by trying out various strategies and sight adjustments.
Shoot Consistently:
Maintain a steady rhythm in your shooting. Create a routine where you draw, anchor, aim, and release similarly.
Seek Feedback:
Get comments on your aiming and sighting methods from an experienced archer or coach.
Archers are constantly working to perfect their sight picture and aim. Your ability to keep your sight pins aligned with the target and maintain a steady aim will improve with time and practice. In the long run, this will enhance your purpose and help you become a better archer.
Step 7
The key to being a world-class archer is mastering the art of the perfect release. Nothing beats a smooth, controlled release for precision and uniformity in your shooting. How to Establish a Trustworthy Release Method
Finger Release:
To perfect your finger release, try these drills:
Wrap your index, middle, and ring fingers around the bowstring for a secure hold.
Use even finger pressure while keeping a loose but secure grasp.
Maintain a straight line between your fingertips and the bowstring.
The key to a successful release is a gradual, even loosening of the fingers. Try not to rip or pluck at the string.
Mechanical Release Aid:
The following are some things to keep in mind if you plan on using a mechanical release assist (typical of compound bows):
Choose a trigger release mechanism that works best with the way you shoot.
It’s important to fine-tune the trigger of the releasing aid so that it releases smoothly and reliably every time.
To improve your shooting, try to squeeze the trigger smoothly and slowly.
Back Tension Release (for Compound Bows):
To better their release technique, some archers employ a tension release assist for the back:
You don’t pull the trigger but instead use your back muscles to remove through the shot.
Keep your back muscles tight and practice drawing and holding the bow at full draw.
When the pressure gets too great, your back automatically triggers the release assistance, allowing you to execute the shot.
Consistent Anchor Point:
As we discussed, keeping your anchor point constant will help you keep your release point consistent across shots.
Avoid Target Panic:
Be wary of target panic, a psychological condition that can induce archers to initiate the release in anticipation of the shot prematurely.
Talking to a coach or trying specific tactics will help if you suffer from target fear.
Practice:
Mastering the release technique requires consistent, dedicated practice. Build muscle memory and consistency by spending time on the range and focusing on your release.
Seek Feedback:
Ask a seasoned archer or coach for input on improving your release.
Picture yourself letting go quickly.
Before firing, practice a calm and deliberate release in your mind. I am teaching positive routines through visualization.
It takes practice and patience to perfect your release technique. Finding a release technique that works for you, whether you want to use your fingers or a mechanical device.
Step 8
The follow-through is an often-overlooked yet vital part of archery that significantly impacts shot accuracy and consistency. Here’s the right way to follow up:
Maintain Form:
Keep your shooting form steady after letting go of the arrow. Do not change your position suddenly or slouch.
Keep your drawing hand on your anchor point, and your bow arm stretched toward the target.
Steady Aim:
Maintain a steady aim even after letting go of the arrow by keeping the sight or pins lined up with the target.
Don’t make the rookie error of letting your bow arm drop or taking your eyes off the target after you’ve taken a shot.
Complete the Shot:
The draw, anchor, aim, release, and follow-through are all integral parts of the shot process. The last part of the process is the follow-through.
Continue to Focus:
Focus on your point of aim until you see the arrow strike the target or the end of impact if you’re firing from a great distance.
Keeping your mind on your shot like this allows you to examine its accuracy better.
Analyze and Learn:
Consider your follow-through when evaluating your shot. If the arrow misses its mark, you should investigate the cause of the misfire.
If you have problems with the execution of your shot, you can fix them by watching the follow-through.
Relax Gradually:
Holding your follow-through for a few seconds will allow you to loosen your bow arm and drawing hand gradually.
This easing ought to occur naturally over time rather than all at once.
Establish Consistency:
Building muscle memory and perfecting your follow-through via repeated practice is vital to finishing each shot accurately and correctly.
The accuracy and consistency of an archer’s shots greatly benefit from a well-executed follow-through. It’s a great way to hone your shooting skills, get a better read on your shots, and stay engaged in the action until they’re finished. You may improve your archery accuracy and performance by practicing a powerful follow-through.
Step 9
Improve your archery skills by consistently practicing. These tips for efficient and consistent practice can help you advance quickly and reach your goals in archery.
Set a Practice Schedule:
Create a practice schedule that works with your other obligations. Set aside regular hours and days to hone your archery skills.
Maintaining a routine is essential; doing so is in your best interest.
Quality Over Quantity:
Don’t worry so much about how many arrows you shoot in practice as how well you shoot them. It’s not about how many pictures you take but how well you take them.
Warm-Up Routine:
Every shooting practice should begin with a thorough warm-up to prepare the muscles and mind for action. Doing some light workouts like stretching or shooting from close range will help.
Goal Setting:
For each training session, decide what you want to accomplish. Your objectives may focus on enhancing particular facets of your form, such as your precision or consistency.
Drills and Exercises:
Practice sessions should include a wide range of activities. These can focus on specific archery skills, such as aiming, releasing, or following through.
Focus your efforts on strengthening your specific areas of weakness or improvement.
Record Your Progress:
In a journal, Document your progress, objectives, thoughts, and observations after each practice session. In doing so, you can observe your development over time.
Seek Feedback:
Find a coach or other experienced archers to practice with so they can help you improve.
Mental Training:
Invest some time in mental conditioning activities like meditation and guided imagery. Archery requires not just physical proficiency but also mental toughness.
Mix in Variety:
Only sometimes take shots from the same spot or in the same weather. Change up your routine to better prepare yourself for new obstacles.
To avoid exhaustion and overuse problems, taking time off between training sessions is essential.
Rest and Recovery: Archery development can be sluggish, but you must keep a good attitude and patience. Enjoy even the smallest of victories and grow from your failures.
Adapt and Adjust: You may need to change your training plan as you improve. You should give yourself new goals when you reach previous ones.
Enjoy the Journey: Have fun as you work to become a better archer. Mastering this time-honored practice can be a gratifying experience.
The best way to get better at archery is to practice often, with an eye on quality and a dedication to ongoing development. Regular practice is essential for progress in any endeavor, whether for competitive purposes, hunting expertise, or pure fun.
Step 10
If you want to get better at archery, recording and analyzing your shots is a great way to do it. It aids in finding problems, keeping tabs on development, and adjusting accordingly. Follow these steps to document and examine your shooting technique properly:
Use Video Recording:
Get a video camera or smartphone and mount it on a tripod so you can take a side view of your shooting form.
Ensure the camera can see your body, the bow, and the target.
Analyze Your Form:
Carefully examine the recorded footage of your shots. Here are some crucial parts of your form to focus on:
Posture and stance
Holding and holding position
Knocking and sketching
Sighting in and aiming
Method of letting go
Consistency in each of these areas is required for success.
Seek Coach Feedback:
Consult a seasoned archery coach or other qualified archers to examine your recorded film.
Their observations can point out problems and recommend concrete ways to fix them.
Take Notes:
While watching the clip, make comments on any flaws or strengths in your shooting technique that you may have seen.
Take note of any problems or trends that keep cropping up.
Set Specific Goals:
Based on your analysis and feedback, determine where you can progress most in your archery technique.
Set reasonable targets to serve as checkpoints along the way.
Implement Corrections:
Make an effort to refine your performance in light of the comments and critiques you’ve received.
Don’t let all the shifting of things overwhelm you.
Compare Shots Over Time:
Keep a running log of your footage and periodically review it alongside earlier clips to see how it has changed.
In this way, you can see if you’re improving over time and if those enhancements are lasting.
Visualization and Mental Practice:
Use the video as a visual aid for rehearsal and practice. Maintaining proper form requires regular self-observation.
Stay Patient and Persistent:
Realize that improving your technique and form takes time. Take your time and keep at it.
Regularly Review and Adjust:
You should evaluate your recorded shots regularly, even after you’ve made adjustments. Problems, however minor, often reappear.
Continually evaluate your progress and make any necessary adjustments to your training plan.
You may significantly enhance your archery skills by recording and analyzing your shots. You can pinpoint the aspects of your form holding you back and work to improve them. You may improve your accuracy and ability as an archer by constantly making little adjustments and keeping track of your progress.
Step 11
Now we come to the last step of the topic,11 Steps to Archery Success, which is the crucial one.
Success at archery requires a solid mental game. Improving one’s shooting skills requires training the mind to concentrate, visualize success, and remain calm under pressure. Here’s how to train your mind for success and use imagination during archery practice:
Mindfulness and Focus:
Focus your full attention and conscious awareness on your archery practice. Learn to concentrate on the present moment and improve your aim.
Master the art of tuning out noise and other disturbances so you can focus on the task at hand.
Visualization:
The ability to visualize success in an archery competition is a tremendous one. Close your eyes before each shot and imagine making a great shot.
Visualize every step of the process, from getting into position through drawing, aiming, releasing, and following through.
Imagine the arrow striking the bullseye dead center.
Positive Self-Talk:
Develop a constructive monologue with yourself. Substitute positive affirmations and reassuring self-talk for negative thoughts and self-doubt.
Remember your accomplishments and the things you do well as an archer.
Mental Rehearsal:
Shooting in bad weather or at a competition are two examples of difficult situations you should mentally practice for.
Think through potential scenarios to approach them with self-assurance and mastery.
Relaxation Techniques:
Try relaxation techniques like deep breathing, progressive muscle relaxation, or meditation to handle stress and anxiety better.
Keep your calm and concentration sharp by practicing these methods before and throughout your archery workouts.
Goal Setting:
You may improve your archery skills by setting specific, attainable goals. Targets must be defined in detail and tied to a particular time frame.
Setting objectives can help you continue training with enthusiasm and focus.
Overcoming Mistakes:
Acquire the ability to recover from failures and mistakes quickly. Recognize that making mistakes is inherent in gaining knowledge.
Instead of concentrating on previous failures, focus on the here and now and future opportunities.
Visualization During Off-Time:
You can benefit from regular visualization even when you’re not practicing archery. Every day, devote some time to mentally practicing your shots.
Pre-Shot Routine:
Develop a regimen you always follow before taking a shot and having a set process to follow before each photo might help you get in the zone.
Stay Positive and Patient:
Keep a good mood and be patient while working on your mental fitness. Although development may be slow, consistent efforts will eventually bear fruit.
You may enhance your performance under pressure, maintain focus, and make precise shots regularly by working on your mental fortitude and adding visualization techniques into your archery practice. You may improve your archery skills by tapping into the power of your mind and working on it often.
Conclusion
These 11 steps to archery success follow the guidelines of NATIONAL ARCHERY IN THE SCHOOLS PROGRAM (NASP).
Keep in mind that mastering the art of the bow takes practice. Have patience with yourself and keep your sights set on attainable objectives. Working with a licensed archery coach can also speed up the learning process.
|
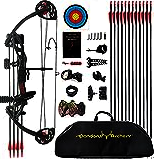
PANDARUS Compound Bow Archery for Youth and Beginners
|
Black Hunter Original Recurve Bows for Adults Hunting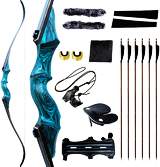 |
Bow and Arrow Equipment Portable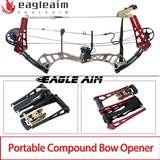 |